Sunday, December 31, 2017

Thanks and Happy New Year

Thanks very much to all the people who have read my blog over the past year, commented, given feedback and encouragement. I really appreciate it, it's an important part of blogging and indeed my life in general.

I hope 2018 is a fruitful and creative year for you all!

Friday, December 29, 2017

Paying Attention

By paying close attention to the tension of my chains, I managed to get a motif that lies flat, unlike the one I described in this post. I do think that tension is an aspect of tatting that needs attention. If your tension differs from that of a designer, you can end up with something unsatisfactory. That's not serious on a tiny square like this one (3 cm square) but can be a major disappointment on a large piece if it cups or distorts.

Thursday, December 28, 2017

Another Noose

This necklace reminds me of the scarf I knitted last year. I used this beading pattern, but used more colours. I considered arranging the colours randomly, but I like the way the colours reappear regularly. I gradually increased the number of beads in the rounds leading up to the loop, and it did work better than my previous attempt.  Here are a couple of closer views of the necklace:
The discs at the bottom were handmade by my sister-in-law, Clare Gaylard.

Tuesday, December 26, 2017

Alternative


Many of you will have already heard of Cathy de Greef's project to create a huge tatted piece in Brussels, using tatted squares made by tatters around the world. Here's a link to her page that explains the project. I think it's an interesting idea, I'd like to be part of it. Cathy has a pattern for a square on her page. I tried it using Ninetta's tip in this post, I tried it starting with a ring as muskaan showed in this post.  My results were less than satisfactory - my squares do not lie flat!
I should fiddle with tension and picot length until I get it right.  I may still do that. But since the brief says other patterns will be accepted as long as they measure 3 cm square, I thought I'd look at alternatives. The thread on Craftree about the project had two alternative patterns. One of them is pretty but a bit fiddly for mass production. This is the other one:
It lies flat and has the right measurements, hooray. I had a look at Jane Eborall's square motif. It's too big, but gave me the basis to create a smaller square that has the correct measurement. Aha. Here's a photo with the stitch count:
I've created a pdf version, there's a link on the right hand side bar and here it is again. Always good to have alternatives, don't you think?

Friday, December 22, 2017

Thursday, December 21, 2017

Flowery Bracelet

This was a fun bracelet to crochet, quite a complex design considering it has a circumference of only 6 beads. The pattern came from this website.

Tuesday, December 19, 2017

According To Plan

Plan B, that is. Because this fabric is very flimsy and has to be lined, I decided that the elastic casing I devised for the previous blouse would work better than bands. The project took me longer than I expected, but it went smoothly and I think it turned out well.

Monday, December 18, 2017

Snakeskin

My colours are a bit garish, but I really wanted to try this pattern from Pinterest so I just used beads I had on hand. Because beaded crochet looks serpentine (to use muskaan's word), there are a number of 'snakeskin' patterns. I saw a picture online of a magnificent necklace, with memory wire inside the crocheted rope and a shaped snake head, so that it looked as though the wearer had a snake wrapped around her neck.  Not for the faint of heart, methinks. My bracelet is perfectly benign!

Sunday, December 17, 2017

Boring

The experts in my craft group gave the thumbs down to my more flamboyant ideas for a crochet scarf. But this version is so boring that I'm having difficulties finding enough oomph to get on with it! I'm committed to finishing it though because the crochet section is the only one I'll be entering in next year's competition. The knitted article is a knee length pullover. That doesn't float my boat, and I'm not prepared to spend a lot of time and money on something I'm not going to wear, since I've already learnt that my chances of pleasing the judges are somewhere between nil and nothing.

Saturday, December 16, 2017

Another Loop Bracelet

I had fun finding a pattern that would match well with the lampwork bead. The loop was a bit trickier than the black one of a couple of posts ago. I tried to work it with a circumference of 4 beads, but it looked very messy, so I used 6 beads instead. Luckily the crochet is very easy to undo and try again. I decided to count the beads I used in the loop, just for reference.  I used 160. That's more than I expected, so it's good to know.

Thursday, December 14, 2017

Marie's Pattern

Marie McCurry has kindly shared the pattern for her lovely Icy Blue Snowflake here. I don't know if I added the beads differently to how Marie added hers, but I had to have 60 beads on the ball thread and 84 on the shuttle, as opposed to the 48 on the ball and 96 on the shuttle that Marie specifies.

Because I used size 20 thread rather than the size 80 that Marie used, I used a stitch count of 4 instead of 5. Here's how I added the beads:
4 beads on back of the hand, Ring 4+4, move 3 beads from back of hand and 1 bead from shuttle, 4-4, Close, trapping the 4th bead. Reverse work.
Move 2 beads from ball thread and 1 bead from shuttle into place.
Ch: 4, move 3 beads from ball, 1 bead from shuttle, 4. Reverse work.

Thanks Marie!

Blooming Ice Drop

This is a pattern created by Diane, the Lace-loving Librarian. I intended to tat it all in yellow, but the thread had a flaw just as I finished winding the first shuttle. I decided that as I had to join threads anyway, I might as well use two colours. A nice case of serendipity!

Tuesday, December 12, 2017

In The Loop

I wondered if I could crochet a loop with a circumference smaller than the body of the rope. I could. This loop is four beads around, whereas the bracelet is six beads around. It might be important to make sure the thread and beads match for such a small circumference. The black was hard to work with, but effective.

 I wanted to be sure that the button-loop would hold the bracelet in place, so I wore it for a while:
It held fine and was very comfortable to wear.

The big beads are lampwork created by Clare Gaylard.

Monday, December 11, 2017

Plan B, Plan C

I bought this fabric months ago on a sale. Yesterday I thought I'd use it to whip up a blouse. The project didn't go according to plan. Firstly, the fabric had been so badly cut in the shop that I couldn't get all the pieces out. What to do, what to do?  After some contemplation, I decided to leave off the bands under the bust and use wide ribbon to create a casing for elastic. Right. I cut out the pieces minus the bands.

Next job was to apply iron-on stiffening to the neck facings. I bought 2 metres of the stuff recently, so I hauled it out and tried to figure out which was the sticky side. After a couple of trial runs, I had a very gungy iron and realised that both sides are sticky! It's not interfacing, it's fusible web for joining two pieces of fabric. Luckily I have a cleaning product designed for taking labels off jars that did a fantastic job in cleaning the iron. So I found some scrap fabric and fused it to the facings using the fusible web.

By the time I'd made plan B and plan C, the day was gone. I finished this morning according to plan, without mishap, hooray! 

Saturday, December 9, 2017

Rainbow Ice Drop

This pattern is also by Nicola Bowersox - can you tell I like her style? Rainbow thread and blue beads seemed perfect to suit the name.

Thursday, December 7, 2017

Lariat

This is a trial-run for an idea I have to show off a focal bead. I'm not sure I have the right seed beads on hand for that project, so it may have to incubate a bit longer. I think this one works pretty well on its own merits.

My noose still needs some work. I"m thinking I should work the increase before the split a bit more gradually. I worked two beads into each stitch and then did one more row before splitting. A more gradual increase should give a smoother look.

Wednesday, December 6, 2017

Working On It


I started this crochet rope as a bracelet, but it doesn't work. It's a long bead sequence: three repeats is too small and four too large. So I'm making a necklace instead. Which takes very much longer!

Tuesday, December 5, 2017

Doing The Splits

I followed a link on Pinterest to this tutorial on splitting a crochet rope. It's in Russian. At first I thought I could figure it out by looking at the pictures. Mmm, no. So I used Google translate. It throws up some odd phrases - "Master-class on bifurcating the bunch" - but it did enable me to learn how to do it. Aha.

So then I looped the loop:
It'll need a bit of practice to get smooth and neat, but I'm absurdly pleased at having come this far.

Sunday, December 3, 2017

Elana PDF

I've created a PDF pattern for the Elana Ice Drop, here's a link. There's also a link on the right hand side bar. I hope it's clear and helpful!

Elana Ice Drop

I followed a link on the Facebook Ice Drop Addicts page to 
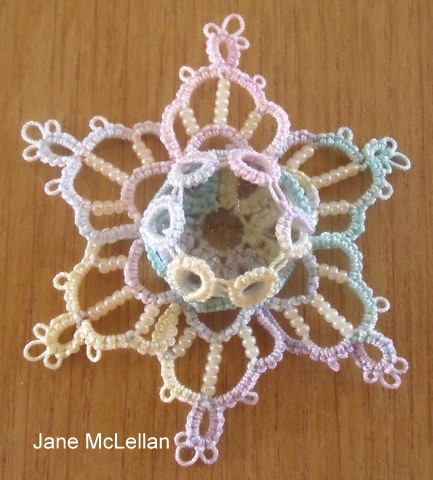
this tutorial for an Ankars style brooch. Beautiful, isn't it? I thought I'd see if I could adapt the pattern to fit in with Diane's  Basic Ice Drop pattern. I could, though it wasn't as easy as I supposed! Took me many hours. So that I don't forget what I did, I'm going to write it down here. I could also make a PDF pattern, if anyone else is interested.

Elana Ice Drop

Wind two shuttles CTM with 49 small beads on shuttle 1 and 11 beads on shuttle 2. I used a Starlit shuttle to for shuttle 1, as the beads filled an aero one up too quickly.

MB - move bead into position. SS swap shuttles. SR split ring, RW reverse work

Round 1 and 2 as for the Basic Ice Drop.

Round 3
SR 1: put 1 bead on back of hand, using shuttle 1.
4MB4/4MB from shuttle thread of shuttle 2, 4, close.
*
Ch: using shuttle 2 as working shuttle: 6
SS
R2: put 1 bead on back of hand
 7MB4-3
R3: 6+(picot on R2)6
R4: put 3 beads on back of hand
3+(same picot on R2)6,M3B, 6 - 3.
R5: 6+(picot on R4) 6
R6: put 1 bead on back of hand
3 + (same picot on R4) 4 MB, 7
SS
Ch: 6 RW
R7: 4 + (picot on Round 1) 4 Cl, RW
Ch: 6
SS
R8: 7 + (beaded picot on R6) 4 - 3
R9: 6+ (picot on R8) 6
R10: put 3 beads on back of hand
3 + (same picot on R8) 6, M3B, 6 - 3
R11: 6 + (picot on R10) 6
R12: put 1 bead on back of hand
3 + (same picot on R10) 4, MB, 7
SS
Ch 6 RW
R13: put 2 beads from shuttle 2 on the back of the hand
4 MB 4 + (base of ring in Round 2) 4 MB 4 RW
Repeat from *, joining last R12 to first R2, without bead on back of hand, and joining last ch to top of SR.


Friday, December 1, 2017

Cosmic


This is the Cosmic Ice Drop, designed by Nicola Bowersox. I had to revisit Jane Eborall's instructions for adding a bead to a ring. I practised a few times but even so  broke the thread on one bead when I closed the ring.  Those beads are Swarovski  crystals that sparkle in real life, hopefully to look like stars in the Cosmos.

Thursday, November 30, 2017

Flowers

These bracelets are for the same little girls as the charm bracelets in the previous post, so once again I used the same pattern in different colourways. The pattern is called Flowers by SnowMirna. I found it on Pinterest here. It's a pretty design, perfect for little girls.

Tuesday, November 28, 2017

Charmed


A friend of mine asked me to make bracelets for her granddaughters. I used the rainbow pattern from beadpet and added plastic 'charms'.  I thought this pattern would work better than a spiral pattern because it's easy to make sure all the charms are on the same level. I've made the bracelets 'the same but different' to avoid sisterly arguments.

Monday, November 27, 2017

Poppie's Necklace

I hope Poppie likes the necklace I've crocheted for her, a combination of her 'bead soup' and plastic 'pearls'. I had to scratch through the bead soup to find the right size beads - not the tiniest ones, the ones a bit bigger, perhaps size 11/0. It's interesting how difficult it is to be random in loading colours. When I was crocheting, I'd often find a colour repeated sooner than I think ideal. In the end it doesn't matter much, I think the effect is fine.

Friday, November 24, 2017

Sprinkles

My neighbour Poppie came over the other day, bringing an assortment of beads with her:
In truth, most of them are not suitable for beaded crochet. Poppie asked me to make her a necklace using the 'pearl' beads. Hmm. After some contemplation, I thought perhaps I could combine the 'bead soup' in the jar at the bottom of the picture with pearls. I did a sample and thought it looked alright, so I've carried on. Here's a close up:

Thursday, November 23, 2017

Fudge

I've been wanting to try Diane's  fudge patterns. (I nearly said recipes.) Left to right these are Purple Fudge, Root Beer Fudge and Pink Fudge. I tatted the Root Beer Fudge first and thought the long chains might benefit from being joined to each other. So I joined the chains on Pink Fudge and it cupped! Sorry Diane. But I rather like the effect, it looks like a flower.

Wednesday, November 22, 2017

Frivole's Qanik

Joelle kindly sent me the pattern for her Qanik snowflake and so here it is! The long chains are quite hard to tame, but I think I did ok for a first attempt. I made a mistake on the first chain of the second round, but I didn't want to undo a Josephine ring, so I just used the same stitch count throughout.

Tuesday, November 21, 2017

Beaded

This is another of Nicola Bowersox's patterns, called Beaded Ice Drop. I do like the way Nicola gives instructions for needle and shuttle tatters, her patterns are ambitatterous.

Monday, November 20, 2017

Joining

I've resisted joining tatting groups on Facebook because I'm afraid of spending too much time on line instead of in the real world. But when I saw the Birthday Ice Drop on Frivole's blog and God's Kid's blog, there was only one thing to do: I joined Diane's Ice Drop Addicts group. I'm a bit dense about negotiating such pages, but I did find files and Nicola Bowersox's pattern. So here are three Birthday Ice Drops:
Now to upload the picture on the group page, peruse other people's pictures and look at more patterns. The real world will have to wait!

Friday, November 17, 2017

Scarf Begun

I finished the beret and started on the scarf to go with it. The beret needs finishing off and blocking, but I'm going to show it to the gurus in my craft group before I do that. It has a good beret shape, which was one of the requirements for the competition.

Wednesday, November 15, 2017

Beret Begun

I dyed the wool for my beret in August, it's been languishing ever since. At last I've got back to it. The pattern is Cup Cake Rose by Wedina Schmidt, on Ravelry. I've just started decreasing to make the beret shape, so the edge is turning up, but that's temporary. So far, so good! 

Tuesday, November 14, 2017

Beetroot Galore


I spent all morning bottling beetroot, after baking the beetroot in the oven yesterday afternoon. I rather think Jack got a bit carried away when he planted beetroot, there is way more here than we can eat, and he has already given a lot away. Anyway, I have done my part in processing it. Some of it I made into chutney and some I just bottled in vinegar with onion, also from Jack's garden.

Monday, November 13, 2017

Dragon Bracelet

It makes me think of a dragon, but after I'd finished the bracelet, I did some reading and learnt that it's called a Cellini Spiral. I learnt that on this website, Perlenhaekeln, which has a wealth of information about beaded crochet on it. I quote: "The spirals were named after Benvenuto Cellini (1500-1571), an Italian goldsmith and sculptor, a famous representative of Mannerism."   

If you google Cellini Spiral, you're more likely to come across patterns in peyote stitch. That's a different type of beading altogether, though the result looks similar.

Friday, November 10, 2017

Button Flower

I tatted this one a few days ago, as relief from joining crochet squares.

Wednesday, November 8, 2017

Off Centre

After carefully working out how to centre the 'blank' squares in the blanket I've been putting together,  I joined the last row of squares to the wrong end. I didn't notice until after I'd done the edging that the squares are not in the centre at all. I don't want to re-do all that, so I'm going to say that centred is boring and predictible.  I meant it to be like this all the time!

For those who don't want to follow the link, this is a group project blanket that will be given to a family whose son died. His name will be embroidered in the blank squares.

Tuesday, November 7, 2017

Oops!

The question I'm most asked about crocheting beaded ropes is, "What if you make a mistake?" It happens! The picture below shows where I've threaded three green beads instead of two:
The only solution is to get the scissors out, cut the thread and remove the extra green bead:
Luckily, it's easy to join in a new thread, so I just rejoin the thread. I pull the new thread through loops to duplicate the last stitch on the rope:
That stitch is worked as one and then crocheting continues as before. At the end, the two ends are threaded into the rope:
Voila, the join doesn't show:
I have tried hiding the extra bead in the middle of the rope, or missing one stitch to compensate for a missing bead, but it just doesn't work, the smooth 'scales' of the rope are disturbed and the correction is glaringly obvious. But cutting and rejoining is not difficult, thankfully.